Organizing A Pantry for $100 or Less!

I think I have hit full blow "nesting" mode because I suddenly have had the urge to organize everything in my house! One of the things that I desperately wanted to get organized was the pantry in our kitchen.  Now the pantry we have isn't huge, it actually started out as a broom closet but I quickly convinced my husband this wasn't the most efficient use of space and asked him to install some shelving.  After the broom closet was converted, I sort of just threw a bunch of stuff in there, but quickly found it was getting harder and harder to find things, things were expiring, we were opening multiple packages of the same thing....it was a mess! 

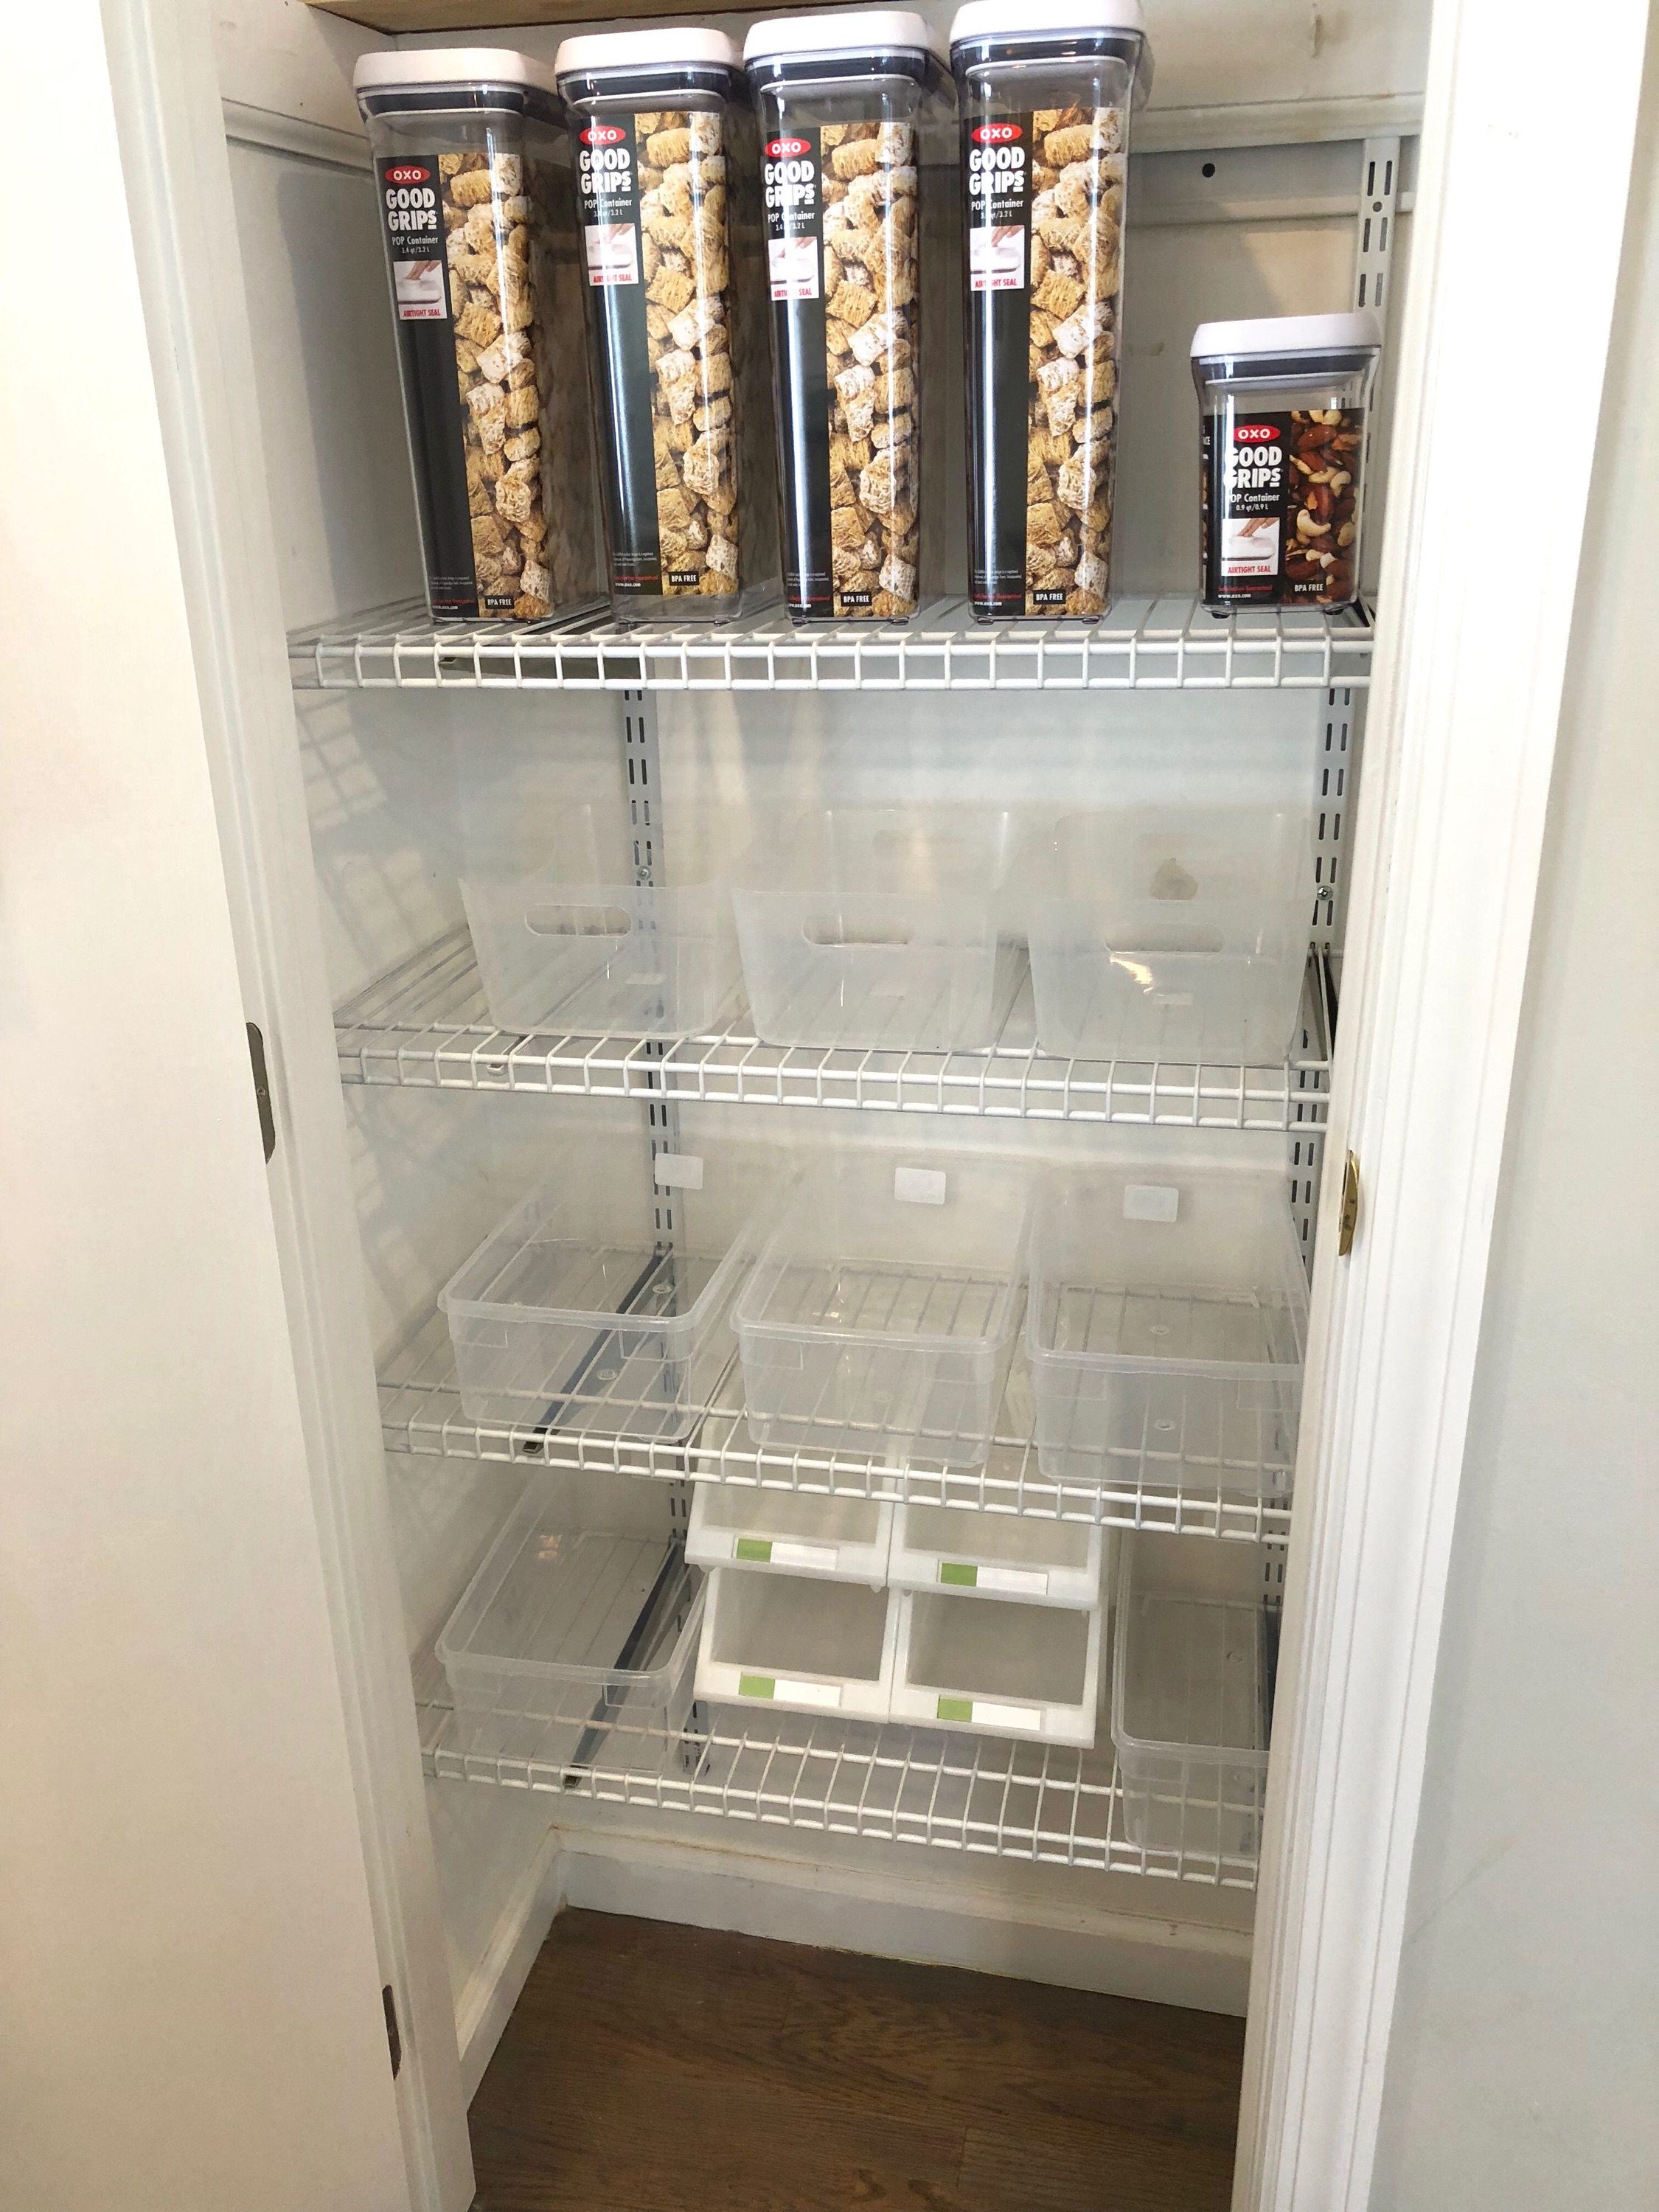
To give you an idea, here's what it looked like BEFORE! What an unorganized mess! 

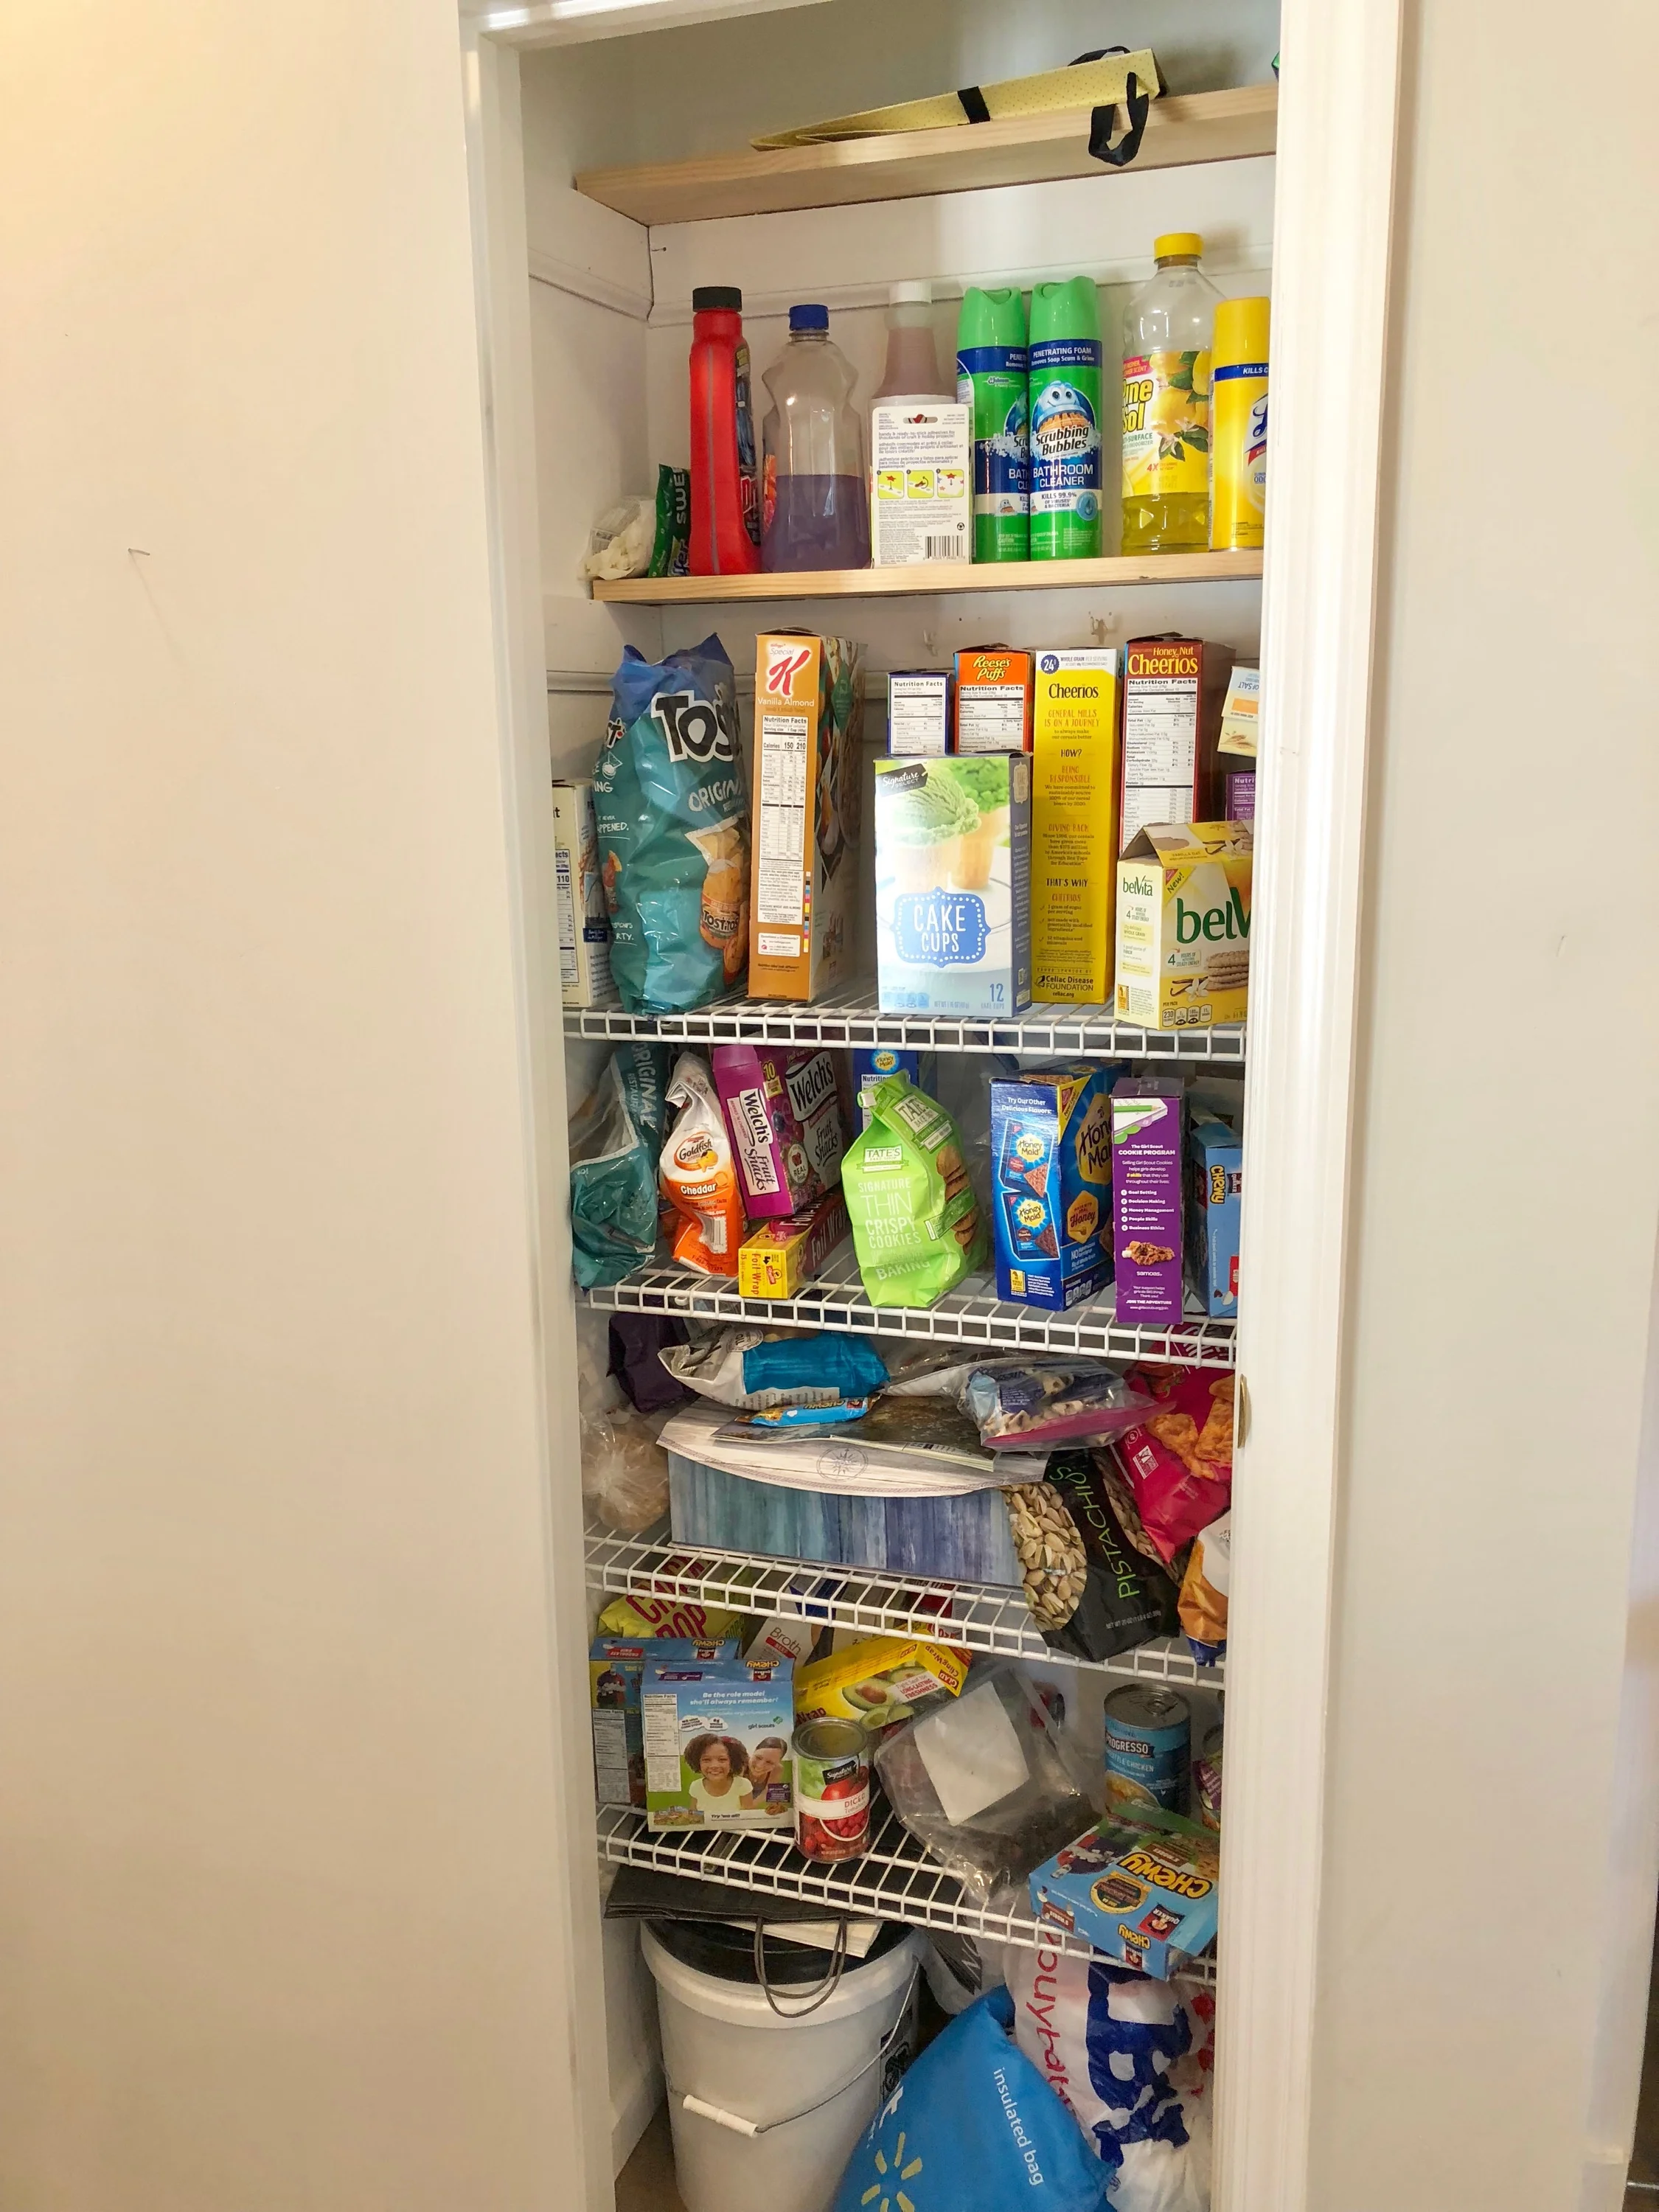
It's pretty apparent from the picture that something needed to be done, so I turned to Pinterest for some inspiration.  There were some great general ideas, but a lot of the pictures featured these LARGE, gorgeous pantries that you could walk into or at least fit a ton of stuff in.  Unfortunately, I was still working with my broom closet so I knew I would have to measure and be a little methodical when organizing it. So, below I'm recapping the steps I took to make sure things would fit before I headed out shopping.

Step 1: Measure the height and depth of your shelving.  My shelves vary in height and they certainly are not very deep, so I needed to make sure I took proper measurements so I didn't have to make multiple trips to the store to pick up all of the organization supplies. 

Step 2: Estimate how many containers you will need and what they will be used for.  I started out with my cereal - on average, I have about 3 boxes of cereal open at any one time, so I figured I would need at least 3 containers to hold that.  Then I moved on to things like canned goods, I wanted to determine how many cans I keep in my pantry normally.  I estimated around about 15 between soups and things like tomatoes and vegetables.  If there are other things you'd like to keep in storage containers that seal, then make sure you also account for those items.  Lastly, I tried to estimate about how many open containers I would need for things like granola bars, snack items, etc.  You can do this by using a shoebox as a good estimator for how many can fit across your shelf. 

Step 3: Go shopping! I picked up the majority of my supplies at the Container Store, but if you don't have any interest in shopping there or there isn't one close to you, you can find these items online and through retailers like Amazon as well.  I will link everything I bought throughout this post!  I set a budget for myself for around $100.  I knew I wanted all BPA free plastic and also some higher quality sealing containers for the things like cereal that I wanted to keep fresh for a long time.  

OKAY - now it is time to clear out the mess and start ORGANIZING! This is the fun part! Or at least I thought so...............


STEP BY STEP GUIDE to the ORGANIZATION

STEP 1: REMOVE EVERYTHING: You'll want to start with a completely clean and open space so you can see what you are working with! 

STEP 2: PLAY AROUND WITH THE LAYOUT - In this part you'll want to lay out everything you bought in order to determine if you have enough things to store all of your items and also to figure out how you want to space the containers, what things you want on what shelves, etc.  Play around with it for a while!  You'll notice that the picture I took here with spacing everything out ended up being a little different from how I actually ended up organizing the pantry.  

STEP 3: ORGANIZE & LABEL - Now it's time to actually start making some progress.  After you've figured out where you want to place everything, you can start labeling and organizing.  I opted to use adhesive chalkboard stickers and a Chalk Ink marker for my labeling, but you can print labels or make them however you want, put your own spin on it!  The thing I like about the chalkboard labels is that you can easily wipe them clean and re-write if you make a mistake or change what is in your containers.  You can also write directly on the bins and containers if they are plastic, glass, etc. with the Chalk Ink markers!

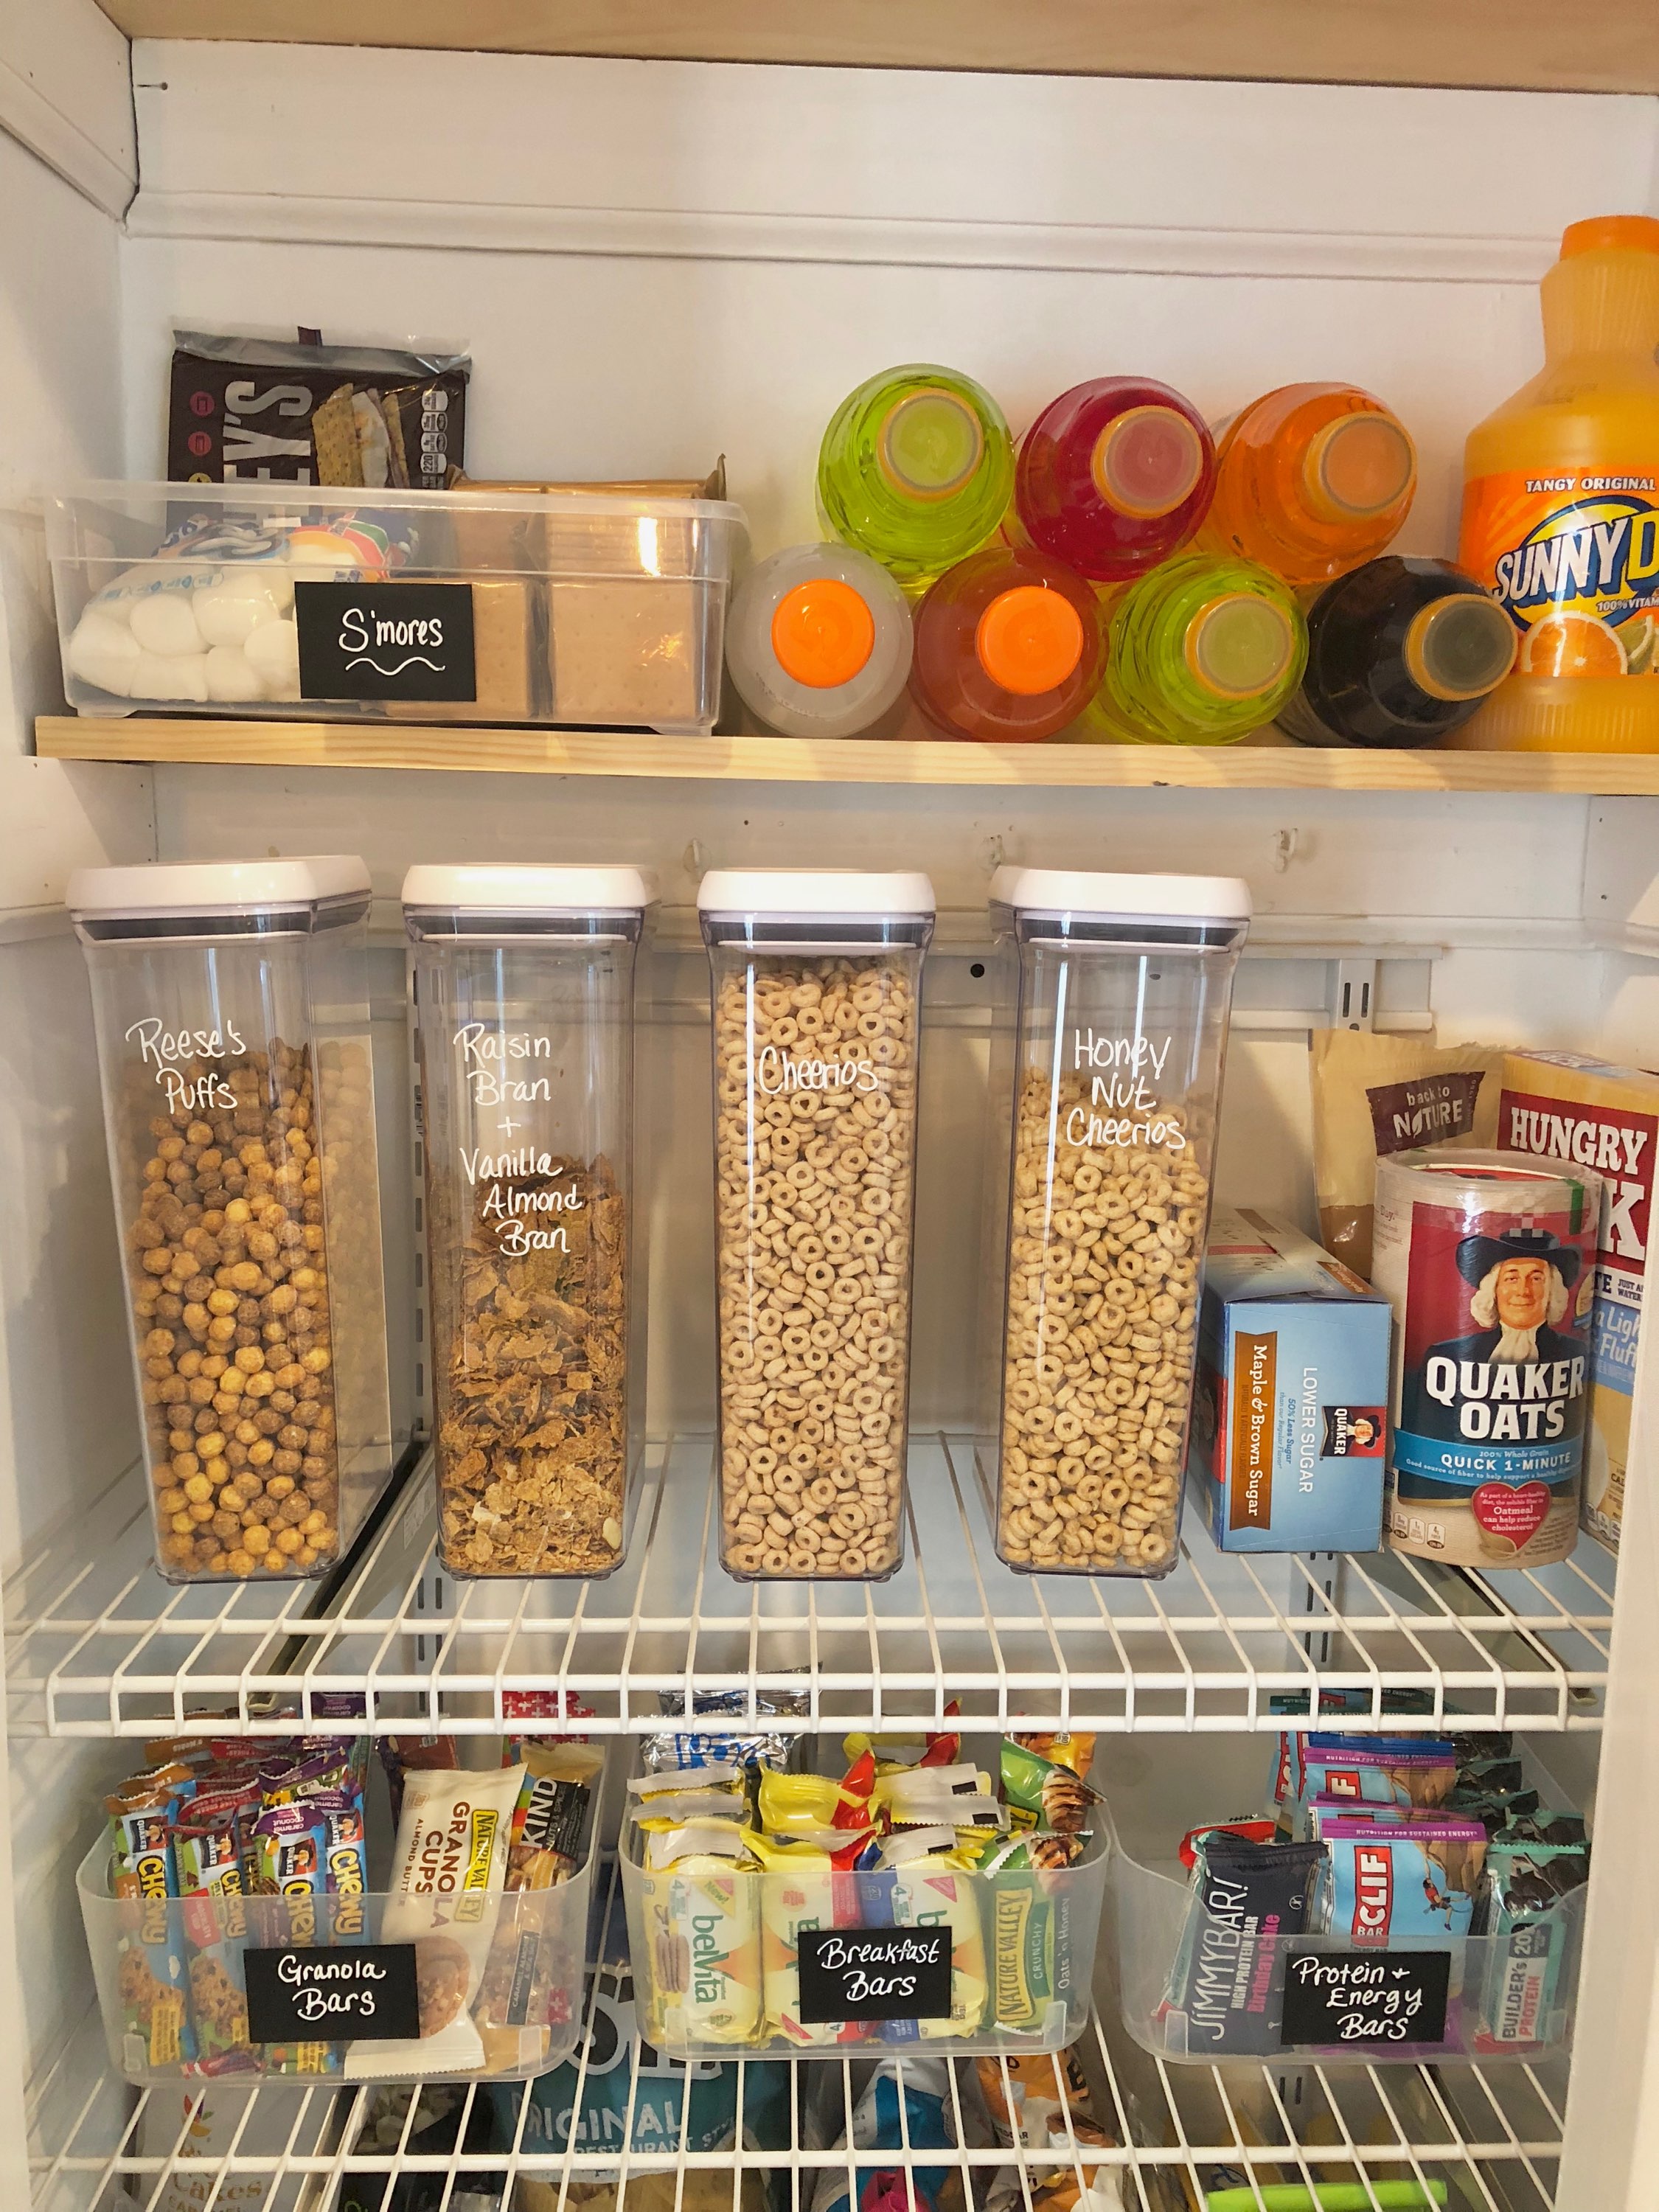
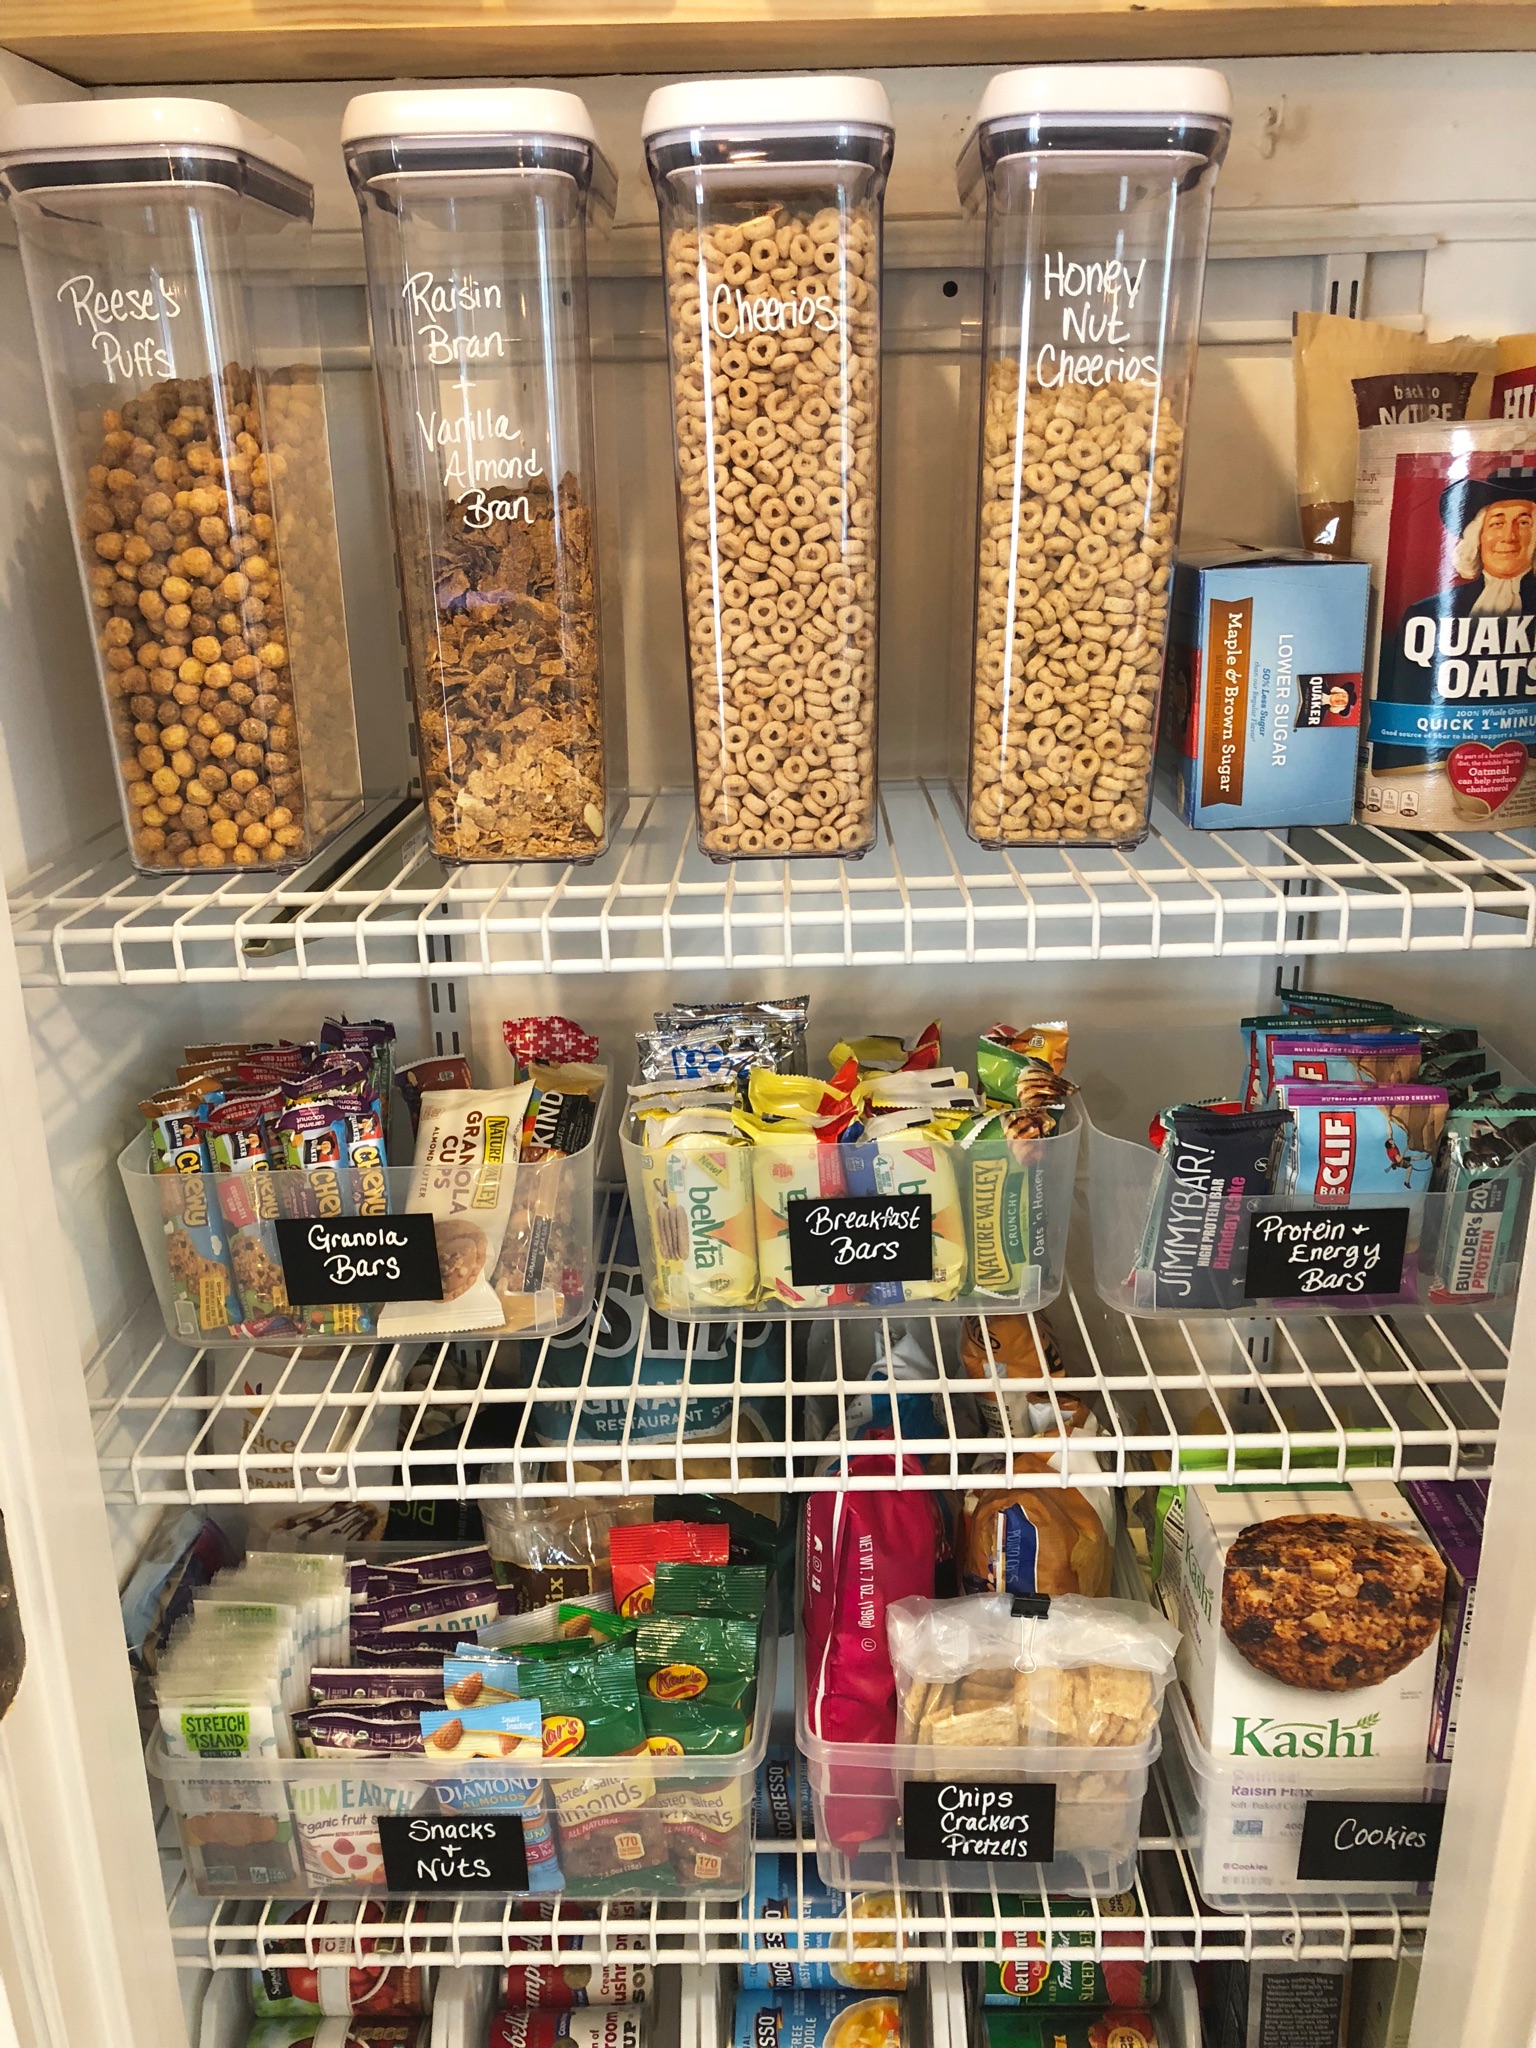
For the containers, I chose a variety of different types of containers and bins.  With the cereal, I knew I wanted to get the sealing OXO POP containers which help to lock in freshness since cereal seems to always go stale (gross)!  If you have a lot of different foods you plan to store in your pantry like pasta, grains, etc., I recommend purchasing an OXO POP Set like this one.  I then found some smaller bins with handles (I purchased the SMALL size) for things like granola and cereal bars.  At the Container Store, there was also an awesome deal on clear shoebox size bins.  If you bought a case of 5, you saved 20%, making each container about $1.60 each..pretty good deal if you ask me! I also found open stackable bins for soup cans and they are the perfect width for large and smaller cans - I got the MEDIUM size!  All of the fancier things made specifically to store cans wouldn't fit into my narrow pantry so when I found these, I figured I'd give them a shot and they are perfect! You can easily stack cans on top of each other but also see everything that you are storing for easy access. They even came with labels already attached so all I needed to do was write on them.

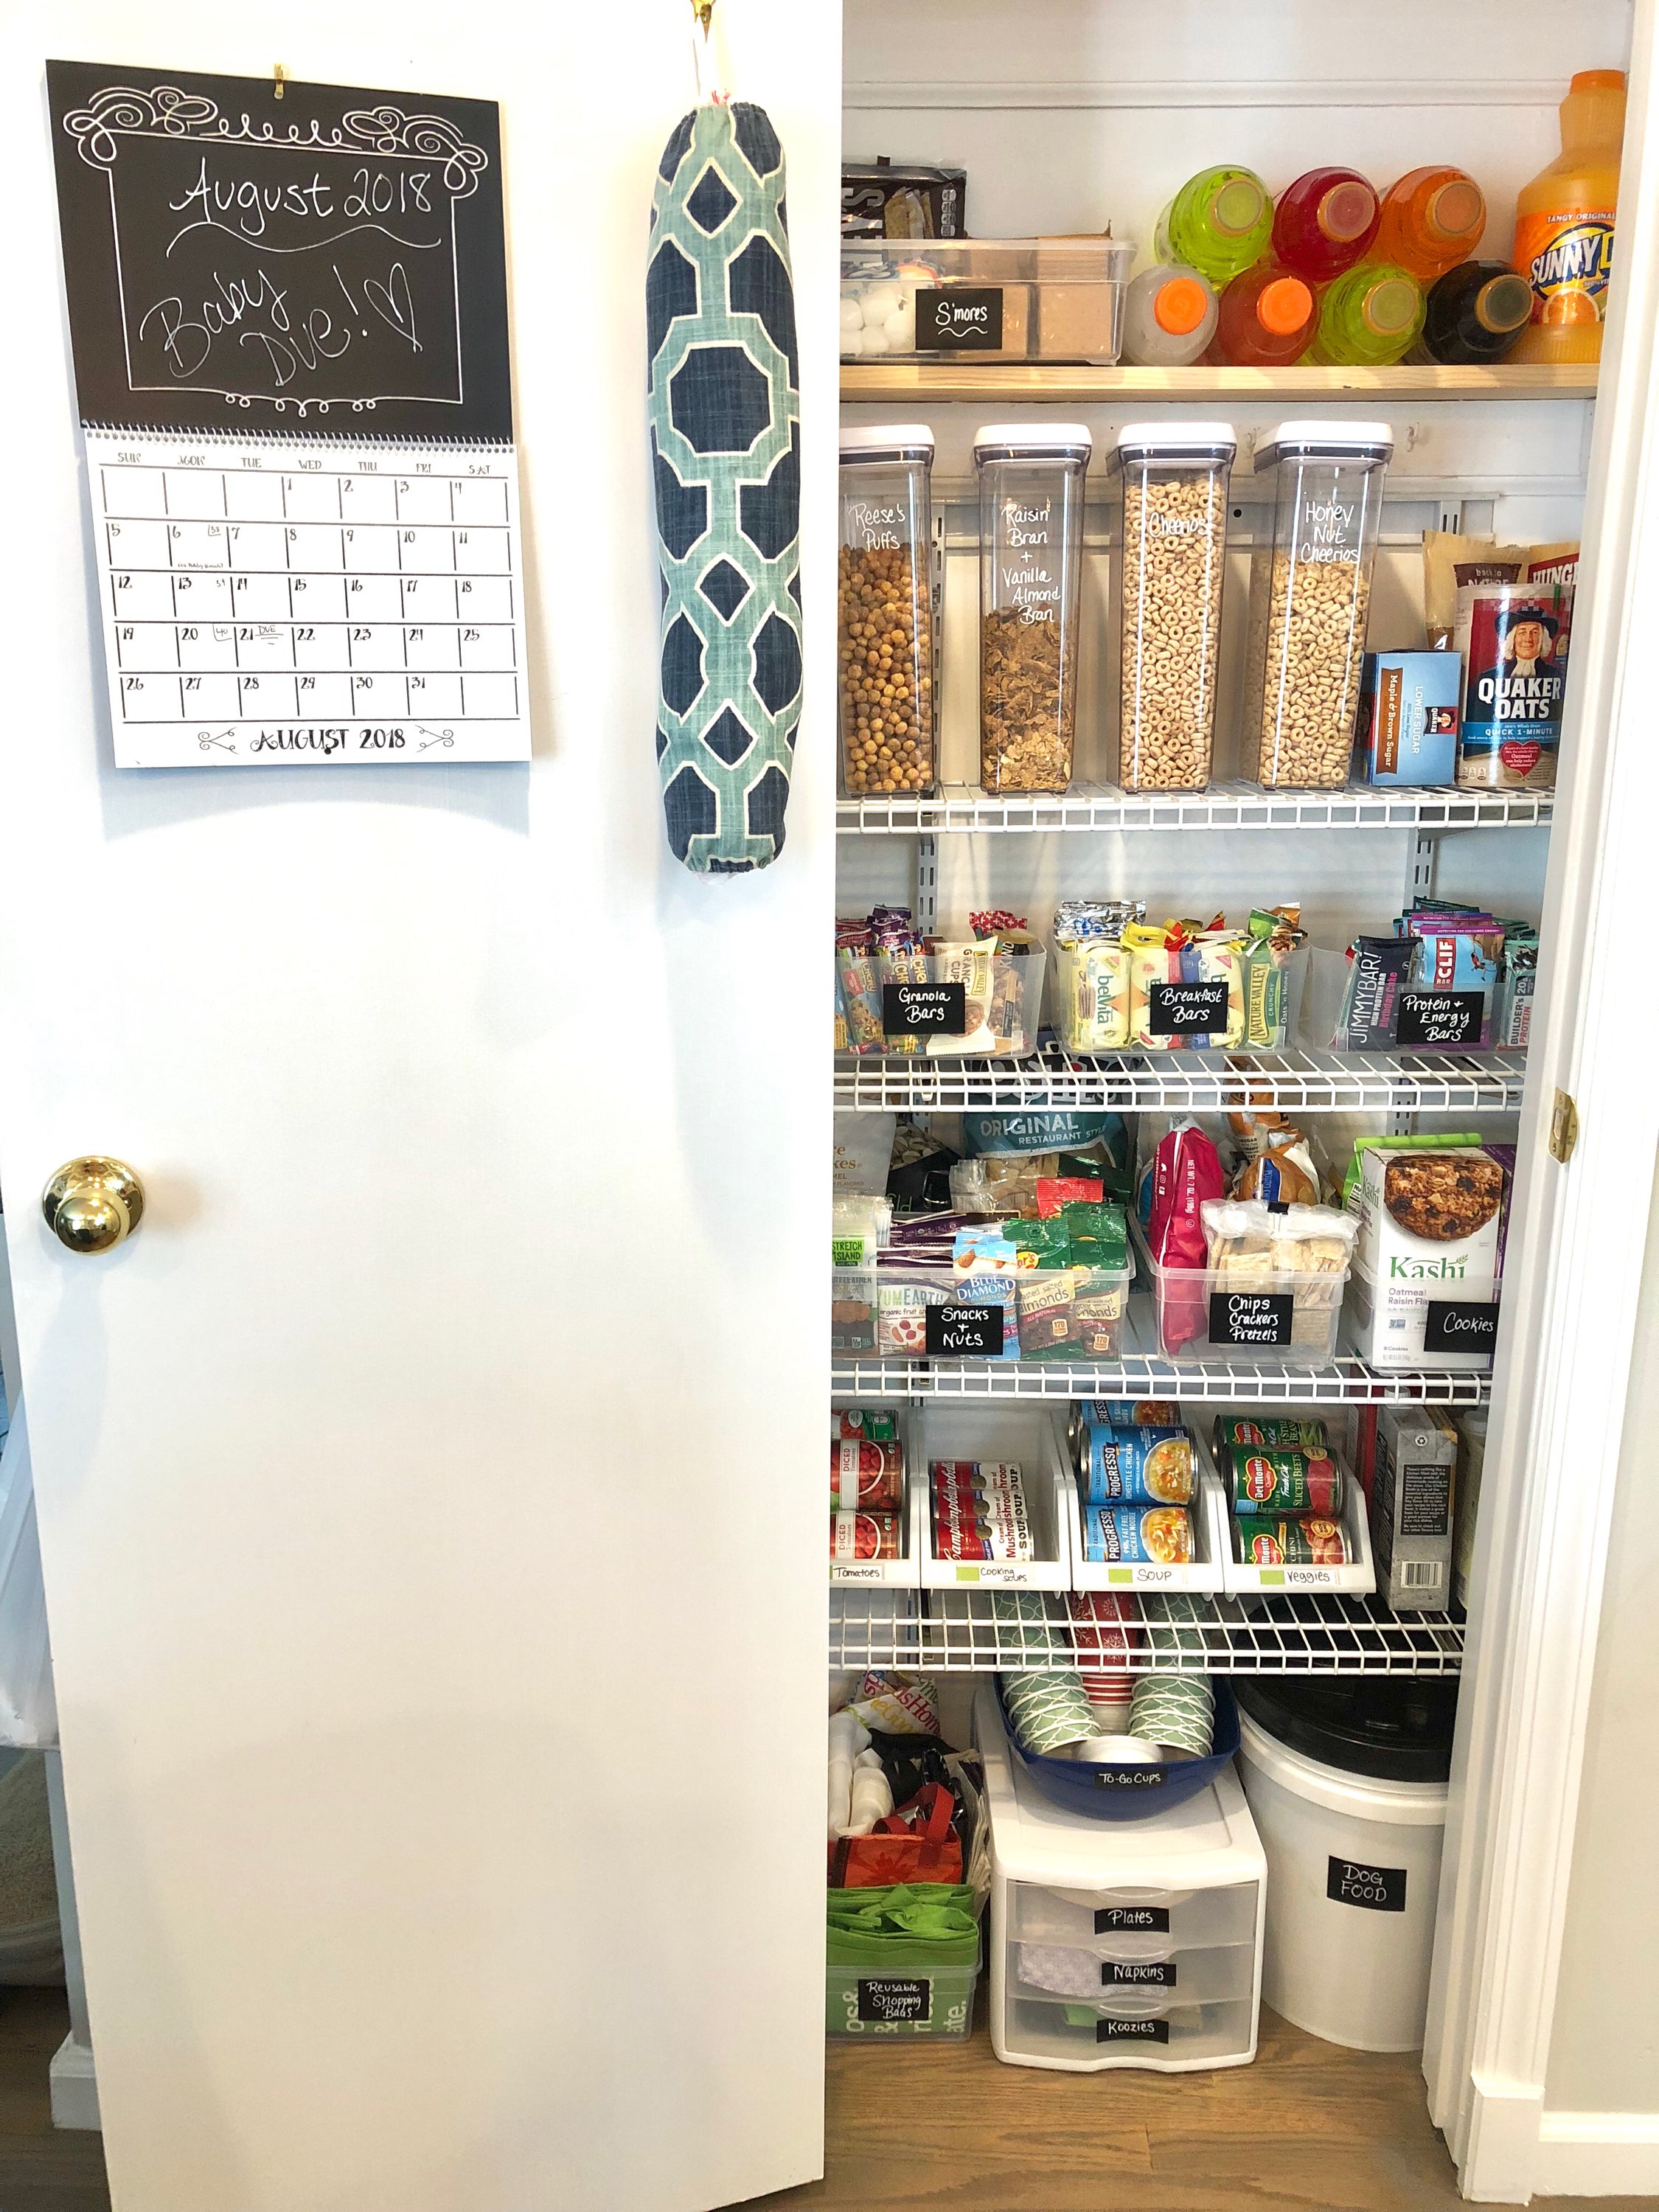
When organizing, I tried to group things by category.  At the top of the pantry we have a really narrow shelf so I tried to come up with some solutions for it.  I realized that it could easily fit bottled drinks like Gatorade which take up a ton of room in a cabinet.  I also have s'mores stuff for the summer, so I figured I would group all of those items together so when we entertain, it is easy to grab the whole bin out and have everything in one place.  I placed all cereal and breakfast items together on one shelf and just below that shelf I grouped together things like granola bars, breakfast bars, and protein bars.  I figured this would make it easier to find and for my husband to find the things that he wants without rummaging through various shelves and messing up the beautiful organization! On the next shelf I grouped together snacks, chips, pretzels, and cookies. Below that shelf, I placed my canned goods like soups, veggies, and broths.  I tried to organize the canned goods by type.  For example, canned tomatoes placed together and cooking soups placed together.  The idea is that when you go to cook, you don't have to spend time sifting through various bins to find what you need.  

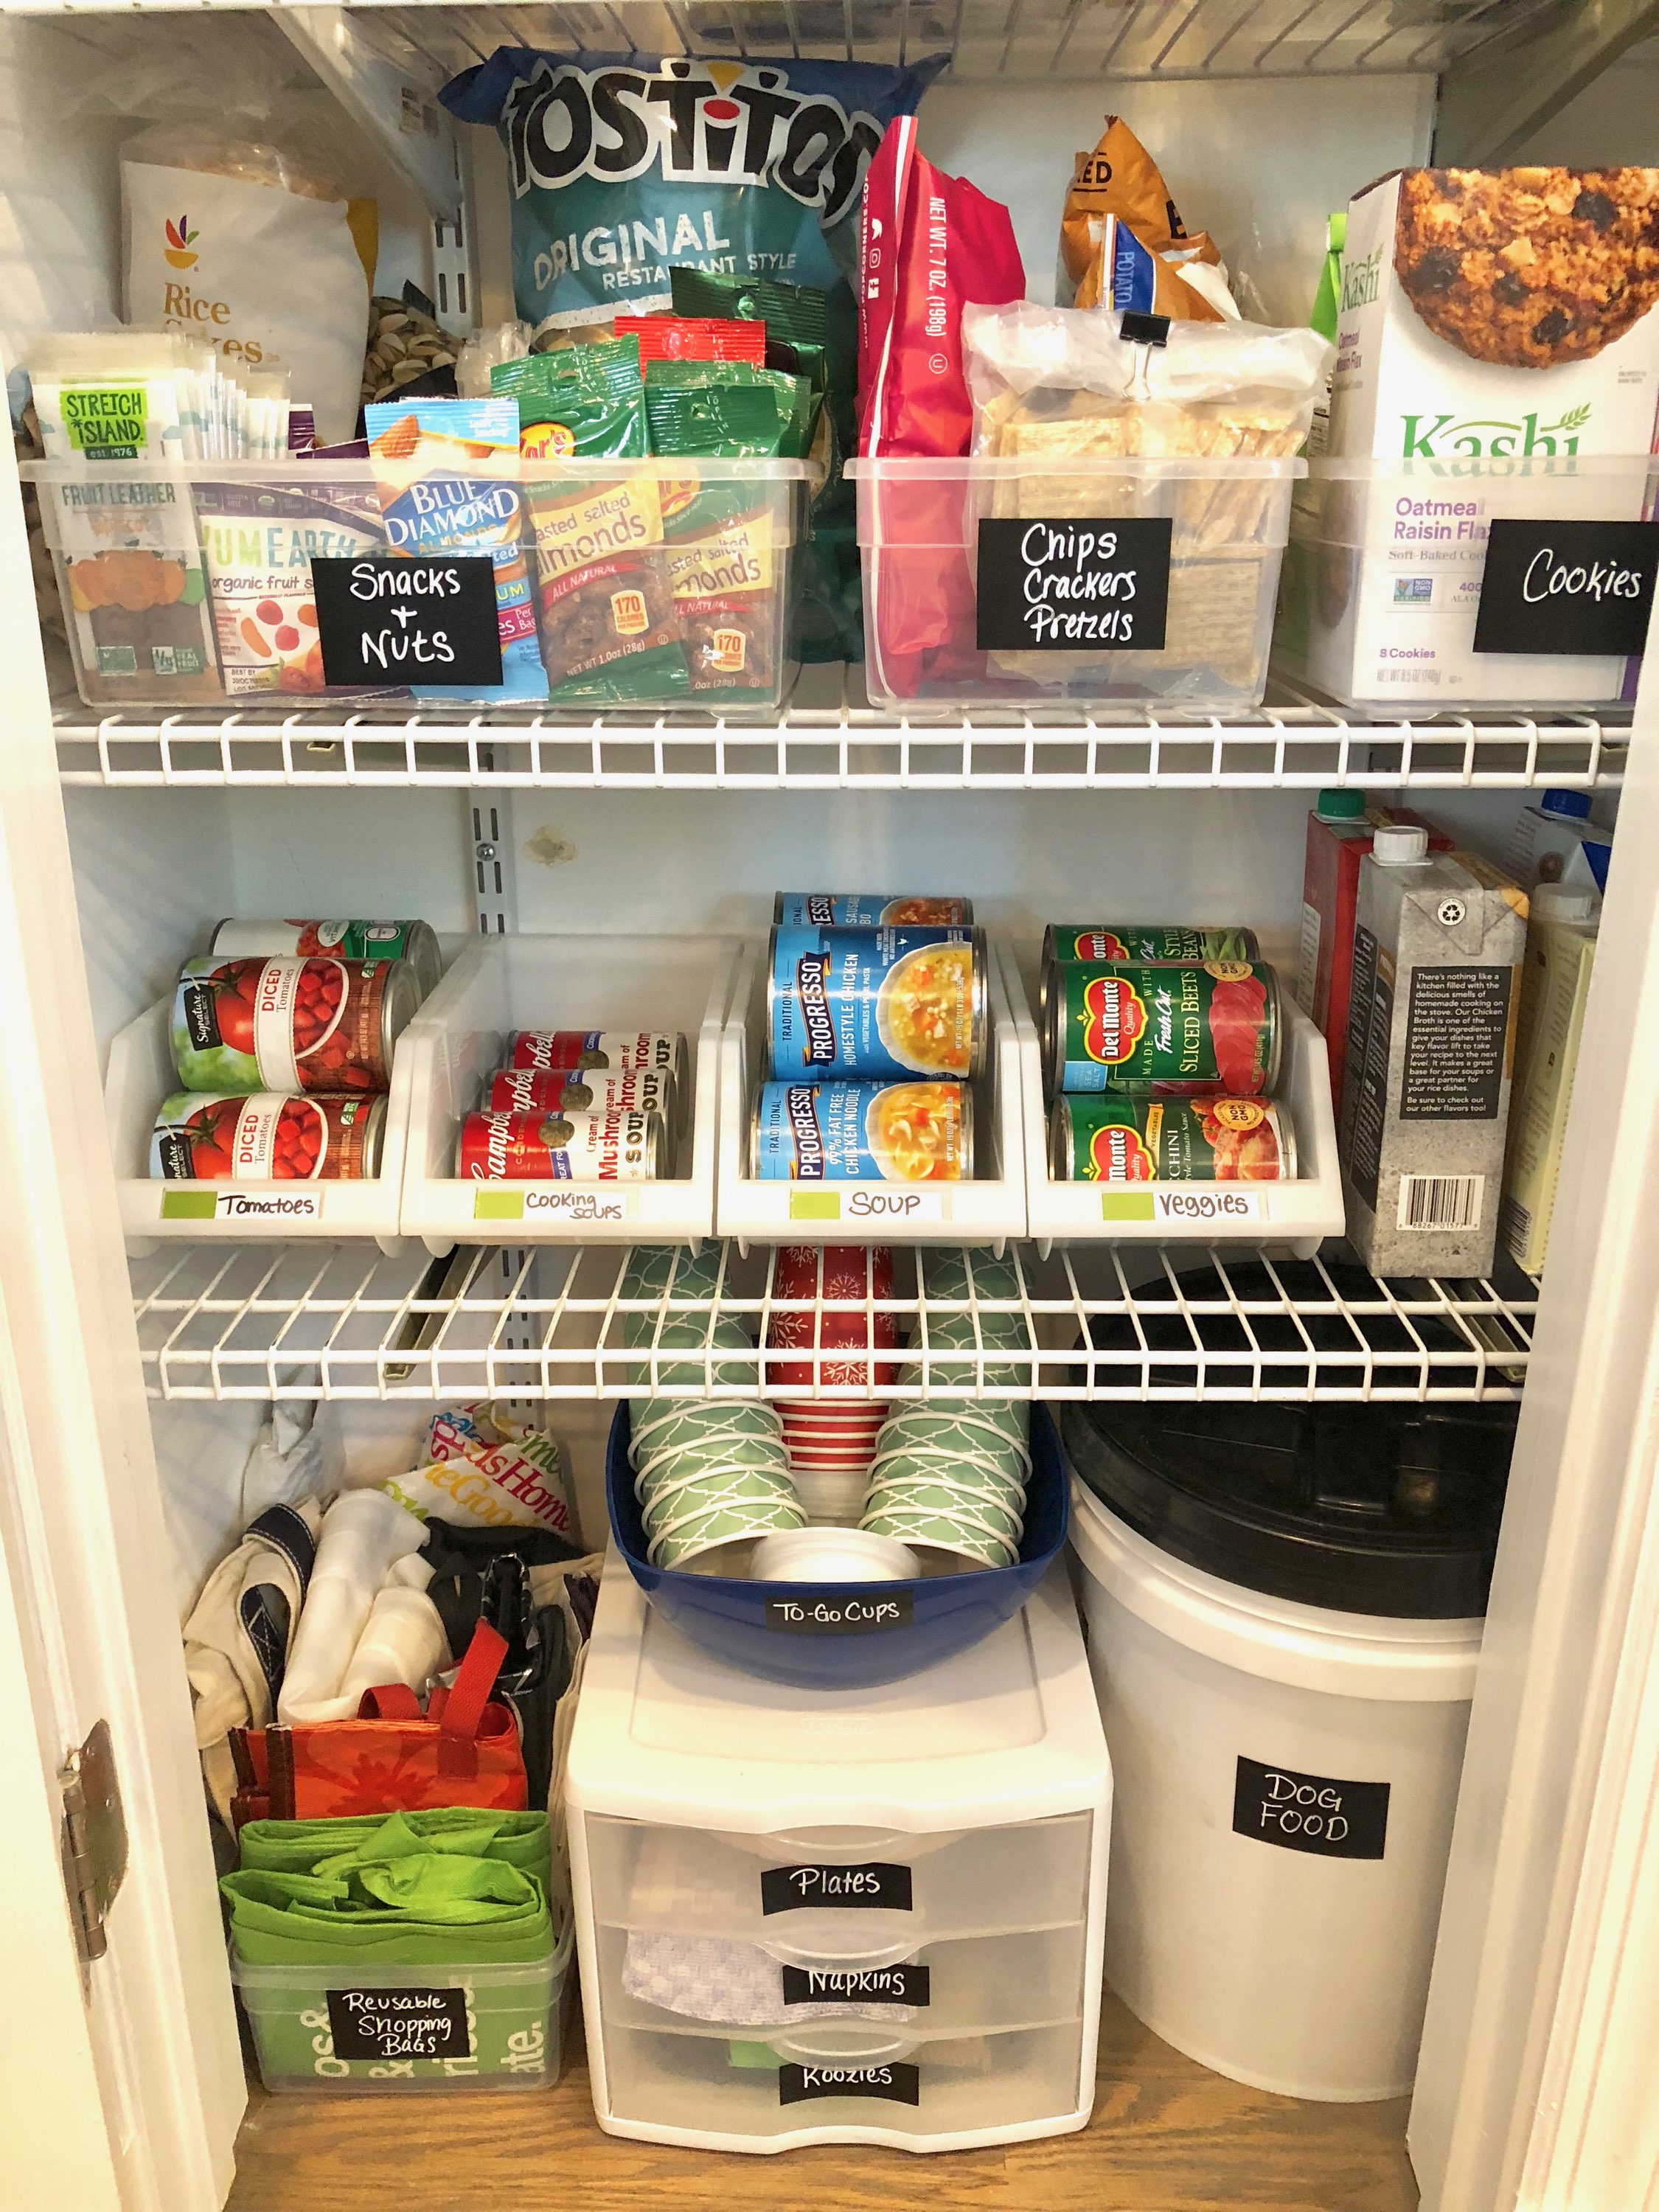
One big thing I figured out is it is always important to utilize floor space! Now I can see people saying ew, not going to put my food on the floor, and my response is you don't have to!  Use any space below your shelves to store miscellaneous items that you don't want taking up space elsewhere in your house, but that you use frequently and want easy access to.

As you can see in the picture above, I used my floor space to hold things like our dog's food.  By the way, don't spend tons of money on those fancy dog food bins, head over to Home Depot or any hardware store and pick up an airtight bucket!  I found this one that is food grade on Amazon! You can fit a ton of food in it and the lid seals even better than some of the specially designed dog food containers do! Now, back to the floor storage...Aside from the dog food, I decided to use a small set of storage drawers for things like paper plates, napkins, and koozies (don't ask me why we have SO MANY koozies) all things that I hate cluttering up my cabinets with! I also had an extra shoe box bin so I decided to put all of my reusable shopping bags in it!  This way, I might ACTUALLY remember to use them.

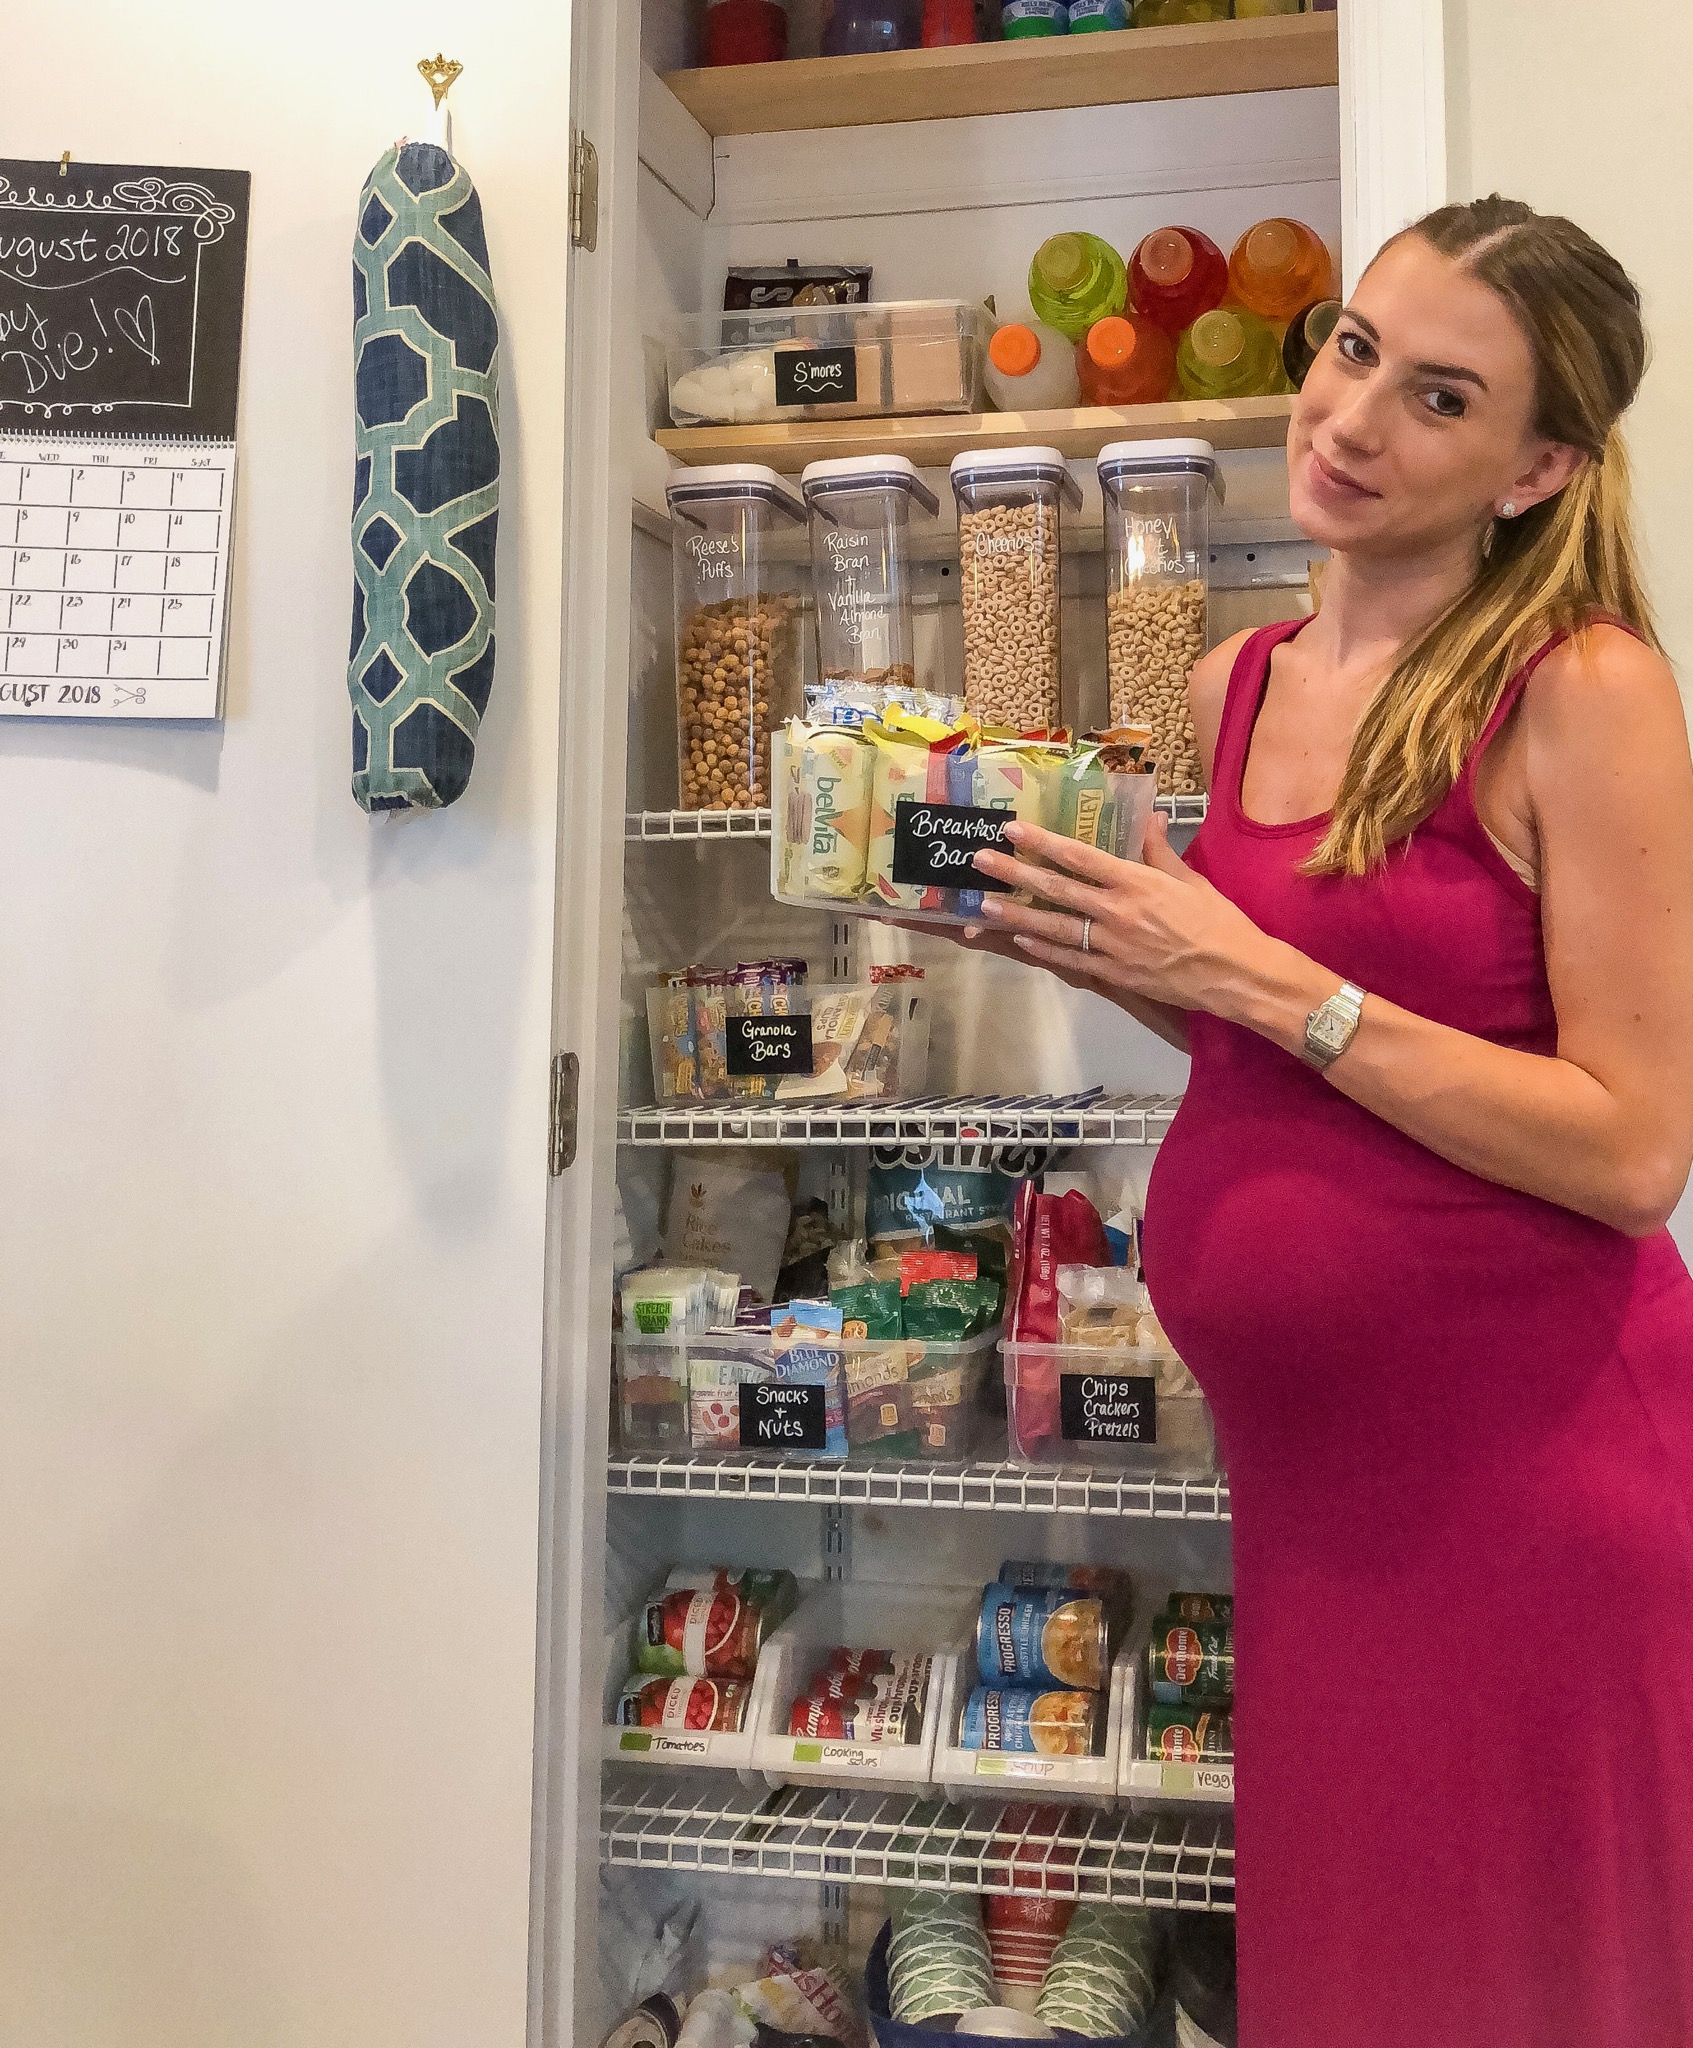
STEP 4: UTILIZE DOOR SPACE - Don't forget that your door is also useable space in your pantry! Now at some point I'll probably try to make even better utilization of it, but for now, it's the perfect place to keep a calendar, since I can't remember anything these days and also those dreaded plastic grocery bags! Does anyone else feel like they haunt you?  They are everywhere! I highly recommend getting one of these cloth bag holders because you can easily hang it on the door and it doesn't take up any space and they won't be falling out everywhere! 

You can see how I utilized the door space and finally the FINISHED PRODUCT! 

I've linked all of the products for you within the step by step guide so you can get organized too!  By no means do you need to use everything that I did, but I found that these products worked really well for me and also for spaces that are shallow and don't have a ton of room.  Let me know if you have any questions - you can always email me directly or reply in the comments below! 

HAPPY ORGANIZING! 

XoXo - Jamie 

**Post contains affiliate links for products which I personally recommend.  By clicking the links and purchasing the products, I may earn a commission. I do not include affiliate links for the purpose of solely earning product commission, I do so in order to share products I love with you! Purchases are made as-is as the consumers discretion** 

Preparing Your Fur Baby for a REAL Baby

So anyone who knows my husband and I, also knows that we are 100% obsessed with our French Bulldog, Havana.  She is honestly our world and we could not imagine life without her!  So, when we found out we were pregnant, we both had a sense of excitement but then also panic because our "baby" would no longer be the only one around.  Havana loves people and REALLY loves my husband (me she could take or leave most days, especially if a waffle or cheese is involved) but this made us really wonder, how would she be with a baby?  What do we need to do?  Do we need special training?  Should I carry around a baby doll?  Is she going to feel completely left out and replaced?  Suddenly, the thought of raising a child also meant potentially re-raising our bulldog...if you have any sort of bully breed, especially a frenchie, you know how stubborn they can be.

After much debate, we sought out a trainer to help us prepare Havana for her new brother or sister.  Below are some of the most important things we learned and are (or at least trying to) work on with her.  At the end of the day, she is basically 25 lbs of kisses and love who wouldn't hurt a fly...literally she just stares at them...so we feel pretty confident that with a few pointers and some patience, we can prepare her for a pretty big lifestyle change!

Β 

1. Claim Your Space - Okay this is classic dog training 101 but we are really bad with it.  Havana is with us all the time whether we are watching a movie or going to sleep, she loves being right in on the action.  But, we found out this is really just encouraging bad behavior and that in order to help keep her from thinking the baby is her personal heated stuffed animal, it is something that we needed to work on.  Our trainer told us not to be afraid to claim your space because at the end of the day, a dog wants to feel safe and wants to be lead in the pack (despite what your dog may make you think).  So, we've started small with claiming things like the couch, the doorway, etc... to try to keep her from unexpectedly jumping up when the baby is next to us.  

2. Sleeping in the Bed - Now I know some people will disagree with me here, but our trainer told us it isn't necessary to kick Havana out of the bed.  I get that some people think its disgusting to sleep with your dog in the bed and I do not judge...I also wonder if those people come home from the NYC subway and sit on their furniture!  Anyways, Havana has slept with us since she was a puppy and does still to this day.  Our trainer said if you have a dog with major anxiety that they absolutely should NOT sleep in your bed because it just encourages it.  However, a dog like Havana, who is pretty independent but just loves to snuggle, is a different story.  Dogs like this can sleep in the bed even when the baby arrives, but, you obviously need to take precautions.  For one, if you plan to co-sleep with the baby, you should make sure you have something like a Dock-a-Tot or other boundary to place around the baby.  Also, you can always kick the dog out of the bed periodically without making him/her feel bad (even though its going to make you feel awful).  For us, we plan to have a bassinet in the room when the baby is small and won't have the baby sleeping in the bed the majority of the time, but, we also have started to work on giving Havana a space of her own off of the bed where she can feel comfortable but not left out.  The trainer let us know that dogs, despite what we may think, don't really have the emotions that we as humans do in feeling "left out"...yes, they may give you those sad puppy eyes, but they aren't going to carry it with them for the next week.  

3. Introducing the Nursery - One other thing we've done is try to introduce Havana to the nursery.  Every time we work on it, we include her in the routine so she can become familiar with all of the new things in the room like the furniture, carpet, crib, etc.  Before, our nursery was an office so she didn't really find it all that exciting, but now when she goes it, she goes crazy with excitement! It's almost better than a treat to her (I said ALMOST) and I know she will always be in there with me and the baby, just watching over everyone to make sure all is okay.

4. Baby Sounds - Playing baby sounds on our phone is another tip!  Now she doesn't seem to be phased by them at all, at least right now, and this could totally be a product of growing up a "city dog" but this was one highly suggested thing from our trainer and from my research.  There are apps, videos, and tons of sources where you can find every baby sound under the sun!  Although you might not want to hear them yet, it will help your dog adjust, especially if he or she is a bit skittish. 

5. The Day of Delivery - Another thing we had to think of was, what the heck do we do with her when we have to leave to go to the hospital, especially if its in a rush or in the middle of the night?  Having a plan for this is crucial.  Don't put it off!  We've arranged for my cousin (who Havana adores) to watch her for the few days that we will be away.  But the important thing is to leave the house as if nothing too crazy is happening...I know this is easier said than done....but she is used to us leaving during the day and having someone familiar to come watch her will help to keep her calm before her brother or sister actually comes home.

6. Baby Scents - Everyone knows dogs love to smell any and everything; its how they explore and learn.  So, one of the biggest pieces of advice we've received is to bring home a baby blanket from the hospital with the baby's scent on it a day or two before you actually come home with your new bundle of joy.  I think my husband will probably come home for an hour or so to do this and leave the blanket in Havana's bed or somewhere where she lays.  That way, she can be familiar with the baby before it even comes into the house and it won't be such a shock to her.

7. Don't forget to LOVE - Now this might be obvious, but in the chaos of everything involving a new baby, it's so important to remember that you still have your fur baby and if he or she is anything like Havana or any toddler for that matter, excitement will be taking over.  I know she is going to want to be involved in everything to do with the baby, she is extremely curious, and there may be some bumps in the road, but just like your new baby, your pup will still need affection and LOVE. 

GGT0GTXBS2Cbdsz7TAk7ng.jpg

Overall, transitioning your pup is a process that is going to take some patience.  Do I expect everything to be perfect?  No way.  But being proactive and taking some steps before your new baby arrives can make life a little bit easier for your fur baby and for your as new parents! 

XoXo - Jamie 

Β 

Hosting the PERFECT Bridal Shower

Keeping it STRESS FREE for the Bride-to-Be

IMG_1494.JPG

BRIDE-to-BE

Tips for an AMAZING and stress free bridal shower!

If any of you out there have planned or are in the process of planning a wedding, you know all too well that it can quickly become STRESSFUL!

Planning a Bridal Shower is just another thing on the seemingly never ending to-do list and it wasn't too long ago that I was scrambling to make sure everything would be PERFECT for my own shower.  

STOP!

If I can give you one piece of advice for anything wedding related it is that not everything is going to be perfect and exactly the way you want it.  If you can accept that very early on in the planning process, you will enjoy wedding planning much, much more and save yourself a lot of sleepless nights and unwanted breakouts.

Okay....now back to the shower! 

IMG_0570.JPG

TIP #1

Β 

RECRUIT HELP!

(What else are sisters for??)

My first tip is to ASK FOR HELP!  I am the queen of multitasking and sometimes to a fault.  I am always eager to take on a lot of projects at once and sometimes I find myself overwhelmed.  With your Bridal Shower especially, try to let go and hand the majority of the planning over to someone else.  Luckily, I have 3 sisters and a lot of amazing friends who were willing to help out to plan my shower.  

Pick ONE person to be in charge, however...with wedding planning, its very easy to get too many "cooks in the kitchen".  I gave my sister Jess the task of spearheading the operation and she did an AMAZING job.

She made sure to ask me about the types of things I wanted at my shower, but handled all of the nitty gritty details herself and also recruited my other sisters and close friends to help with planning various aspects of the party. 

Dont forget, this is still YOUR BRIDAL SHOWER so if you know there is something you absolutely WANT or DON'T WANT, speak up!  I knew I wanted a giant charcuterie board as part of my shower and I was adamant about relaying that throughout the process.  I also knew I didn't want cheesy party games, so I made sure that Jess knew all of these things early on in the planning process. 


TIP #2

SECURE YOUR VENUE & SEND INVITES EARLY

THE VENUE

There is nothing worse than knowing exactly where you want to host your shower and then finding out it is unavailable! With all things wedding, make sure you call to secure any venue early on, especially if you are planning any event from mid-spring through fall! 

Also, don't think you need to spend $$$$ to get a fancy venue.  Chances are, you are already paying a pretty penny for your actual wedding day, so planning your shower or engagement party at your home or the home of someone you know, a park, etc., is a great option.  I personally LOVE hosting in a home because you don't have to deal with food or drink minimums (also budget busters) or guarantee a certain amount of people.  The atmosphere also tends to be a bit more laid back and you don't have a bunch of restrictions on decorating or making things exactly how you want them!

Decor - You can do a lot with the space that you have!  Balloons, banners, and fresh flowers can make any space go from blah to BAM! AMAZING!  For my shower, we utilized the pool and blew up giant balloons to float as well as a big INFLATABLE RING and SWANDA.  It gave an otherwise normal pool, a pop of fun! 

Chairs/Tents - if you know you will need chairs or any other types of materials that require a rental company, make sure you get those early as well.  Again, these companies book quickly during the busy season.  I used these Garden Style Chairs that run about $3.00 a piece to rent.  You can find all sorts of different chairs out there to fit your theme and budget!

THE INVITES 

Another thing to make sure you get done and sent out early are your invitations.  Remember, if you are having a summer Bridal Shower, people plan vacations, graduations, and have other events pretty frequently.  Make sure that once you've secured a date, you send those invites out ASAP!  I would say at least 1 month in advance, but I always err on the side of caution and do a 1.5-2 months, depending on the time of year.

Invites are another thing you don't need to break the bank for!  You can easily create invites from free online templates or even pay a few dollars on sites like Etsy to download a fully created invitation that you just print yourself at a place like Staples or FedEx.  If you (or someone in your group of those you've enlisted to help) are somewhat creative, I say go for making your own!  We created the bridal shower invites from on online template and used this amazing Heidi Swapp Minc Foil Machine to add a touch of glam to the invitations.  It was a great investment because we ended up using it for the wedding invites too!


TIP #3 - The Food

IMG_7670.JPG

As I mentioned earlier, I knew early on in the planning process that I wanted to have an AMAZING charcuterie board for my shower.  After all, any charcuterie board and a nice glass of vino are two of my most favorite things in the entire world.

I got the inspiration for the charcuterie "grazing" table from none other than Pinterest and my sister and aunt really helped to execute it perfectly!  There were so many varieties of Italian meats and various cheeses as well as fresh fruit and also some desserts.  I had about 20 people at my shower and this table was more than enough food to keep everyone happy.  You don't need to go crazy with planning an all out sit down event for a shower..I actually find those a bit annoying as a guest because its much harder to mingle and socialize.  Having some good food and lots of wine and champagne kept my guests happy throughout the shower.

IMG_7671.JPG

I mean seriously.....

How good does this look?! 

(Obviously I was too busy eating it to get great pics)


TIP # 4

Party Games & Entertainment

IMG_7676.JPG

Okay so I usually HATE party games.  I don't know why, but I've never liked them and I really didn't want to have any at my shower.  BUT, my sisters and friends assured me that they wouldn't plan anything too painful!

I actually ended up LOVING what we did at the shower in lieu of "games".  There were scratch off lotto tickets for everyone and some revealed that a guest had won a prize..easy enough!  They also planned to have everyone decorate a mug instead of wrapping each other in toilet paper, which I was totally fine with.  There were easy to follow directions, as well as a ton of different patterns and sayings for everyone to customize their mug with.  

Decorating the mugs allowed for everyone to continue to enjoy themselves, socialize, and also create something customized that they could take home as a favor - win, win!

The mugs ended up being so cute!  Obviously I need to touch mine up a bit, but you get the picture.

LmAHPscPTU+lDBciQIi5Dw.jpg

Wine and Frenchies... really all I need in life 

Β 


TIP #5

HAVE FUN!

This might seem like an obvious one, but I mean it, HAVE FUN!

It is really easy to get caught up in all of the things going on and wanting to make sure everything is perfect for everything wedding related, but take a step back and just try to enjoy the moment!

All of the people around you on your Bridal Shower day are there to celebrate YOU.  Try to relax and take in all of the love and happiness surrounding you on that day.

I guarantee you will have a ton of laughs and it will be a day to remember! 

Thanks so much for checking out this post!  I wish you the best of luck with planning your Bridal Shower or next event.

For any questions, feel free to email me at jamie@ahintofgoldblog.com or reach out on Instagram

Beach + Dogs = Happiness

Like many of you from the Northeast, I grew up spending my summer "down the shore" and visiting the Florida sunshine when snow was the only in sight during the winter.  My family is that family who sits on the beach from dawn until dusk and oddly none of us get bored, we don't complain, its definitely our happy place.  So what can make a the sun and sand even better?  PUPPIES! 

My husband and I share a mutual love for the beach and ocean and dogs, but he is a little less content with just vegging in the sand all day...he needs an "activity".  So, when we would visit South Florida we would always go to the Jupiter Dog Beach....and no, when we started this, we didn't have a dog.  But of course when we got our Frenchie baby Havana (who travels with us EVERYWHERE...more to come on that) we couldn't wait to take her to the dog beach!

Now, every time we visit Florida, we start our mornings with coffee, puppies, and the sunrise.  I'm determined to make this a permanent lifestyle one day, but for now, our few visits per year will have to suffice. 

Β